A step-by-step guide Outlook 2019 is a powerful email client that allows you to manage multiple email accounts in one place. In this article, we'll walk you through the process of setting up your Outlook account, including adding your email address, configuring server settings, and syncing your contacts and calendar.
You can send emails using Outlook 2019. It is pretty straightforward because you do not need to manually log in to the cPanel webmail. You can directly send an email using Outlook 2019.
1. Open Outlook 2019.
![]()
2. Under the Home tab, click on New Email.
![]()
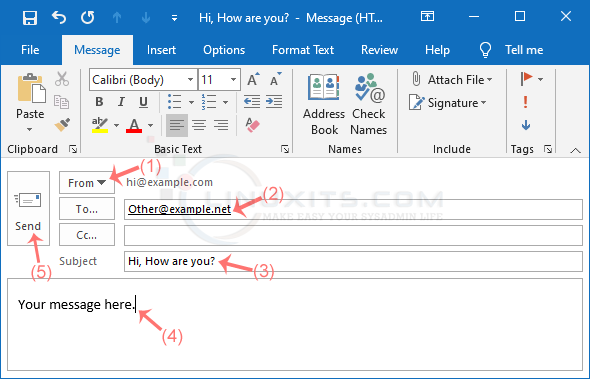
3. A new window will appear. Fill it in with the following details:
From: If you have multiple email accounts, click on From and choose the appropriate email account from which you would wish to send your email.
To Field: Enter the email address of the person to whom you want to send the email.
Subject Field: Enter the subject of your email and your message in the message box. Then click on Send.

Write your message in the message box and click on Send.
Sending emails is not just about hitting the send button. Outlook 2019 allows you to manage and track your outgoing messages effectively. You can set delivery options, request read receipts, and even delay the delivery of certain emails. We'll walk you through these advanced features so you can ensure that your messages are being sent and received as intended.


