I'm sure you've heard about the new advanced features WordPress offers us. The ability to customize and personalize our websites has been nothing short of amazing, but how do we tweak our websites to fit our desire? Sometimes, there's nothing more than a simple manual edit that needs to be performed. This can be done by using a plugin in order to achieve the desired outcome of your website. In today's article, I'll be explaining how to install a WordPress plugin manually.
The automatic installation of a plugin is easy and straightforward. However, you can also install it manually. It will involve manually downloading a plugin, uploading, and activating it.
Make sure you have already downloaded a zip file of the plugin to your desktop.
1. Log in to the WordPress dashboard.
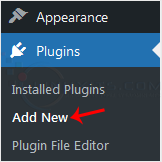
2. From the Dashboard menu, go to Plugins and click on Add New. 
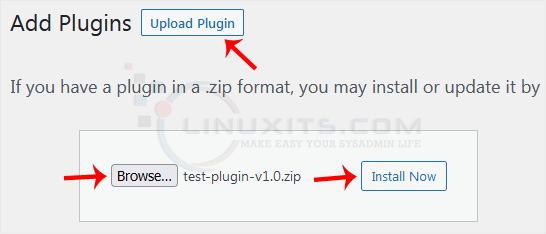
3. Click on Upload Plugin and then on Browse. Choose your plugin's zip file and click Install Now. 
4. Click on Activate Plugin. 
Note: After activating a plugin, a new menu of that plugin is added to the Dashboard menu.
By following these step-by-step instructions and leveraging our expert tips, you'll become proficient in manually installing WordPress plugins and unlock the full potential of your website. Get ready to enhance your site's functionality and take it to the next level with LinuxITs!


