Step-by-Step Guide: Installing SolusVM Master on AlmaLinux
Installing SolusVM Master on AlmaLinux allows you to easily manage and monitor your virtualization environment. Follow our comprehensive step-by-step guide to get started with this powerful IT management tool.
SolusVM is a popular VPS hosting control panel. SolusVM master controls Slave nodes (Servers) and manages VPSs.
What are the requirements?
- Fresh AlmaLinux 8, CentOS Stream 8, or CentOS 7 installed on your VPS/Server.
How to install SolusVM Master?
Step 1: Log in to SSH as a root account.
For AlmaLinux 8 or CentOS Stream 8, run the following command:
curl -o installer https://files.soluslabs.com/solusvmphp7/install/installer && chmod +x installer && ./installer
For CentOS 7, execute the following one instead:
curl -o install.sh https://files.solusvm.com/install.sh && sh install.sh
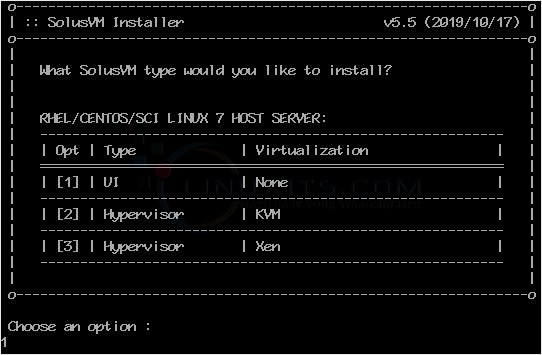
We are going to install SolusVM Master, so we chose option 1.
Enter "1" (without the quotes) and press Enter. 
Installation may take from 5 to 10 minutes and will depend on the speed of your server.
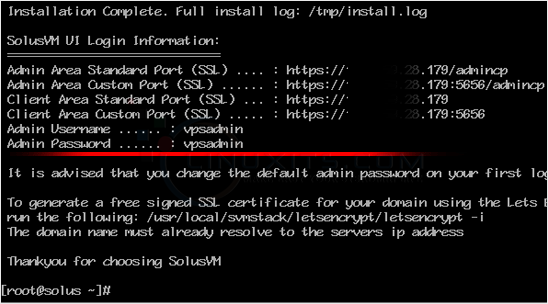
Once the installation is complete, it will show you an administrator URL and the username/password for your account. 
Step 2: You can now access your Administrator control panel. Open your SolusVM Admin URL in the browser and enter your login details. 
Note: Don't forget to change your default username and password for SolusVM. The default username/password is not secure, and it is easy for anyone to access your panel using them.
Installing SolusVM Master on AlmaLinux or CentOS doesn't have to be intimidating. With our comprehensive guide, you'll be able to set up and manage your virtual machines with ease, empowering you to take full control of your IT environment.


