
Step-by-step guide: Enabling the Mailparse Extension in CloudLinux Selector
CloudLinux Selector provides a user-friendly interface to manage various PHP extensions. Enabling the Mailparse Extension using CloudLinux Selector is a straightforward process that requires just a few clicks. In this tutorial, we walk you through each step, ensuring you can easily configure and enable the Mailparse Extension for your PHP environment.
You can use CloudLinux Selector to enable the Mailparse extension in PHP via Plesk.
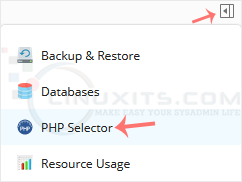
1. Log in to your Plesk account.
2. In the right-hand sidebar, click on PHP Selector.
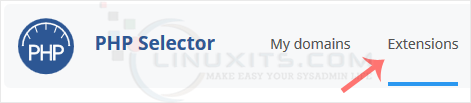
3. Click on the Extensions menu.
Note: If the Extensions page shows an error related to the native PHP version, change it to a non-native version first.
4. Checkmark Mailparse. Once enabled, it will display a success message.

The message will read that the module Mailparse is saved.
Enhance Your PHP Applications with the Mailparse Extension
By following this guide and enabling the Mailparse extension using CloudLinux Selector, you'll unlock a world of possibilities for your PHP applications dealing with email processing. From streamlining automated workflows to extracting valuable data, this extension will take your projects to new heights in terms of efficiency and functionality.
