Step-by-step guide to enable ionCube Loader
Enabling ionCube Loader may seem like a complicated process, but with the help of CloudLinux Selector in Plesk, it becomes much simpler. Our easy-to-follow guide will walk you through the necessary steps to ensure that your PHP files are encrypted and protected from unauthorized access.
You can use CloudLinux Selector to enable ionCube Loader in Plesk.
1. Log in to your Plesk account.
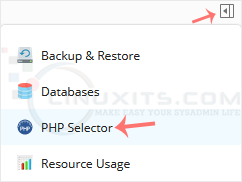
2. Click on the Pull icon in the right sidebar and choose PHP Selector.

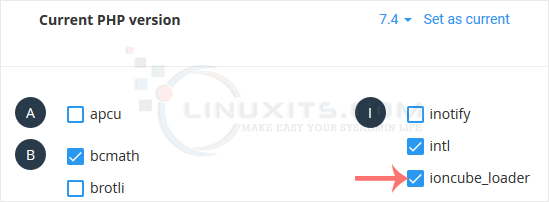
3. Click on the Extensions menu.

Note: If the Extensions page shows an error related to the native PHP version, change it to a non-native version first.
4. Checkmark the ioncube_loader. Once enabled, it will display a success message.

The message will read that the module ionCube Loader is saved.

Remember, enabling ionCube Loader is crucial for websites utilizing encoded files, ensuring secure execution and protecting intellectual property. With our comprehensive guide and the help of CloudLinux Selector in Plesk, you can easily enable this feature and enhance your website's functionality in no time!


