
Step-by-step guide on creating or removing an email autoresponder in SiteWorx
An email autoresponder can be a great tool for managing incoming messages and providing immediate responses to your clients or customers. In this article, we will walk you through the process of setting up an email autoresponder in SiteWorx, step by step.
You can use the email autoresponder for an automated response to your email subscribers. It can prove very helpful when you are on vacation or in similar circumstances.
1. Log in to your SiteWorx account.
2. In the Email section, click on Autoresponders. ![]()
3. Click on the Plus icon. ![]()
4. Enter the following details:
- E-mail Address: Enter the email username on which you want to enable the autoresponder. For example, if you want to use it on [email protected], enter John. Choose the appropriate domain from the drop-down menu in case of multiple domains.
- Send copy to: Leave this as it is or enter the e-mail address where you want to receive a copy of your emails.
- Autoresponder Message : Your vacation message.
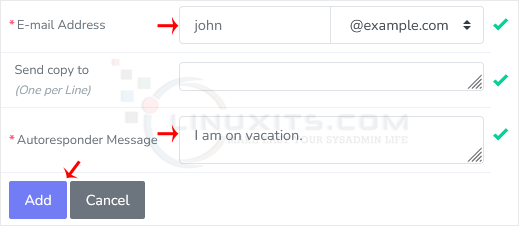
5. Click on Add.
How to remove Autoresponder?
1. Open Autoresponder.
2. Under the Existing Autoresponders, click on the Delete icon next to the e-mail address. 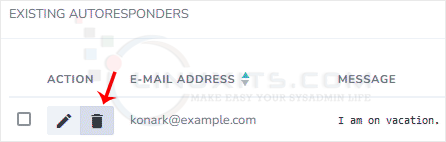
3. Confirm with Delete.
Remember, effective communication is key to running a successful business, and LinuxITs is here to provide you with the Linux tutorials, how-tos, tricks, tips, and guides needed to improve your administrator skills and enhance your productivity.
